BSidesSF 2021 CTF: Net Matroyshka (Author Writeup)
Net Matroyshka was one of our “1337” tagged challenges for the 2021 BSidesSF CTF. This indicated it was particularly hard, and our players can probably confirm that.
If you haven’t played our CTF in the past, you might not be familiar with the Matryoshka name. (Yep, I misspelled Matryoshka this year and didn’t catch it before we launched.) It refers to the nesting Matryoshka dolls, and we’ve been doing a series of challenges where they contain layers to be solved, often by different encodings, formats, etc. This year, it was layers of PCAPs for some network forensics challenges.
The description from the scoreboard was simple:
We heard you like PCAPs, so we put a PCAP inside your PCAP.
You were provided with a file 8.zip, which yielded 8.pcap when unzipped.
Layer 8: HTTP
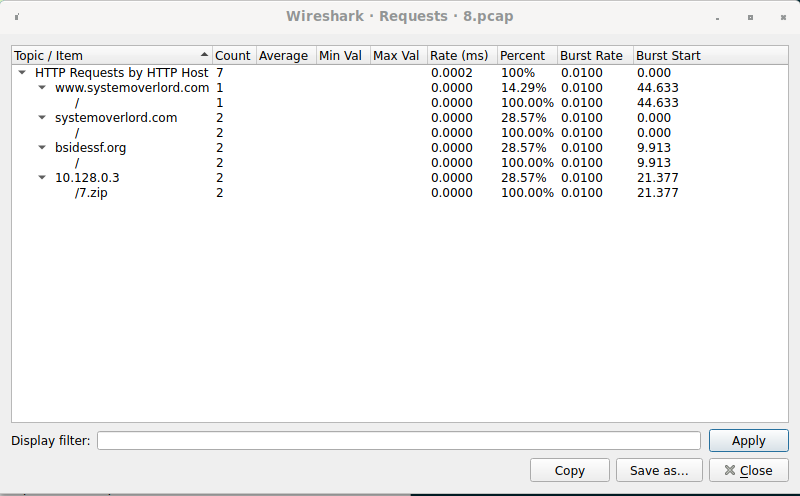
Looking at 8.pcap in Wireshark, we see a bunch of small HTTP packets and
several HTTP connections. If you look at the HTTP request statistics, we see
several connections, including the BSidesSF website, my website, and a request
to a private IP for a file named 7.zip.
Guessing that we’ll need 7.zip, you can use Wireshark to extract the HTTP
object (the contents). (File > Export Objects > HTTP) Extracting 7.zip, you
discover that it requires a password. If you return to the connection in
Wireshark and look at the TCP connection with Follow TCP Stream, you’ll see
the full HTTP Request/Response. In the response, there’s a header that says
X-Zip-Password: goodluck,havefun. Using the password goodluck,havefun,
we’re able to extract 7.pcap.
Layer 7: FTP
If you open 7.pcap in Wireshark, you’ll discover an FTP connection. The
entirety of the FTP control connection is:
220 (vsFTPd 3.0.3)
USER anonymous
331 Please specify the password.
PASS thisisnottheflag
230 Login successful.
SYST
215 UNIX Type: L8
TYPE I
200 Switching to Binary mode.
PORT 10,128,0,2,226,169
200 PORT command successful. Consider using PASV.
RETR 6.zip
150 Opening BINARY mode data connection for 6.zip (38384 bytes).
226 Transfer complete.
QUIT
221 Goodbye.
Unsurprisingly, we see that a file named 6.zip was transferred. If you go to
the FTP-DATA protocol stream and use Follow TCP Stream, you can hit Save As (in Raw mode) and get 6.zip. Unzipping 6.zip, you get 6.pcap.
(I’m starting to see a pattern here!)
Layer 6: Rsync
(Side note: this level turned out to be much harder than I really intended. rsyncd is not as well documented as I’d thought.)
Opening 6.pcap, you find a single rsyncd connection. You’ll note the
@RSYNCD magic and the version of 31.0. I ended up using the rsync source
code to understand the traffic along with a known sample connection to confirm
my understanding.
I started by looking at
receive_data.
If you follow it down, you see that it calls a function called recv_token.
Following recv_token, we see it calls simple_recv_token if compression is
not enabled.
 1static int32 simple_recv_token(int f, char **data)
 2{
 3	static int32 residue;
 4	static char *buf;
 5	int32 n;
 6
 7	if (!buf)
 8		buf = new_array(char, CHUNK_SIZE);
 9
10	if (residue == 0) {
11		int32 i = read_int(f);
12		if (i <= 0)
13			return i;
14		residue = i;
15	}
16
17	*data = buf;
18	n = MIN(CHUNK_SIZE,residue);
19	residue -= n;
20	read_buf(f,buf,n);
21	return n;
22}
This function reads a serialized integer off the socket (read_int), then
attempts to read up to either CHUNK_SIZE (which is 32k) or the integer bytes.
This is a pretty common pattern: send a length encoded in a fixed format,
followed by that many bytes of data. Most of the time, I would expect the
length to be in “network byte order” (big-endian), but for some reason, rsyncd
uses little-endian. I’m guessing this wasn’t originally specified and
implementations were on x86. (It also makes the code ever so slightly more
efficient on x86.)
So we know now how files are transferred, but it turns out there’s a bunch of
metadata before the file transfer. I didn’t want to deal with decoding that. I
decided to look for the zip file signature as a start, then back up 4 bytes to
read the chunk length. I wasn’t 100% sure this would work, so I set up an rsync
server with a known file to test against, and it did. I used scapy
to extract the packet contents and then Python’s
struct module to extract
information.
Returning to the challenge’s 6.pcap, I was able to apply this technique and
discovered that it was transferred in 2 chunks: the first was 32768 bytes (32k),
which is the maximum CHUNK_SIZE used by rsync, then the 2nd was 3881 bytes.
 1pcap = scapy.rdpcap('6.pcap')
 2sess = pcap.sessions()['TCP 10.128.0.3:873 > 10.128.0.2:57536']
 3# Get application-layer bytes
 4raw = b''.join(p.load for p in sess.getlayer(scapy.Raw))
 5# Find start of zip
 6pk_start = raw.index(b'PK')
 7# get length of first chunk
 8chunk_len = struct.unpack('<I', raw[pk_start-4:pk_start])[0]
 9zip_bytes = raw[raw.index(b'PK'):]
10first = zip_bytes[:chunk_len]
11left = zip_bytes[chunk_len:]
12# get length of second chunk
13chunk_len = struct.unpack('<I', zip_bytes[:4])[0]
14first += left[4:4+chunk_len]
15open('5.zip', 'wb').write(first)
Using this code gave our 5.zip, which contains, of course, 5.pcap.
A lot of people seemed to attempt to blindly carve the Zip file out of the PCAP
stream, using binwalk or other tools. Often, they reported that the file was
corrupted, even specifying that it was 4 bytes. This was probably from the
error received from unzip:
warning [5E.zip]: 4 extra bytes at beginning or within zipfile
Alternatively, attempting to open the resulting 5.pcap with Wireshark gave an
error claiming corruption.
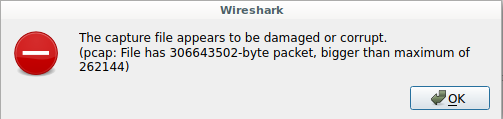
Both of these were caused by the inclusion of the 4 byte length of the 2nd chunk in the data stream. Failing to recognize that it was part of the rsync metadata lead players astray into believing the Zip file or PCAP were corrupt, but it was the packet carving technique that lead to this.
Layer 5: TFTP
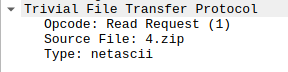
Opening 5.pcap in Wireshark, we find a single TFTP session. TFTP is a UDP
protocol, but we don’t appear to have any missing or out-of-order packets here.
Looking at the TFTP request, we see that there’s a read request for 4.zip, and
that the “Type” is netascii:
If we use Wireshark to extract 4.zip by using the File > Export Objects > TFTP menu option, then try to unzip the resulting file, we’ll be told it’s
corrupt.
% unzip -l 4.zip
Archive:  4.zip
warning [4.zip]:  256 extra bytes at beginning or within zipfile
  (attempting to process anyway)
error [4.zip]:  start of central directory not found;
  zipfile corrupt.
  (please check that you have transferred or created the zipfile in the
  appropriate BINARY mode and that you have compiled UnZip properly)
It turns out that Wireshark does not decode the netascii decoding in the
course of the transfer, so we need to do that after. According to
Wikipedia:
Netascii is a modified form of ASCII, defined in RFC 764. It consists of an 8-bit extension of the 7-bit ASCII character space from 0x20 to 0x7F (the printable characters and the space) and eight of the control characters. The allowed control characters include the null (0x00), the line feed (LF, 0x0A), and the carriage return (CR, 0x0D). Netascii also requires that the end of line marker on a host be translated to the character pair CR LF for transmission, and that any CR must be followed by either a LF or the null.
To do the decoding we must substitute a CRLF (\r\n) pair with a plain
newline (\n), and a CRNUL (\r\0) with a plain carriage return (\r). This
can be done with the following python code:
1data.replace(b'\x0d\x0a', b'\x0a').replace(b'\x0d\x00', b'\x0d')
Note that the order is important, if you reverse the replacements, you could
cause corruption. If we apply this to the 4.zip we got out of Wireshark, we
can then extract the zip file.
1data = open('4.zip', 'rb').read()
2data = data.replace(b'\x0d\x0a', b'\x0a').replace(b'\x0d\x00', b'\x0d')
3open('4.zip', 'wb').write(data)
Unzipping the decoded 4.zip, we get 4.pcap. We’ve now made it through half
the layers! (Unless, of course, the filenames are misleading…)
Layer 4: SMB
Opening 4.pcap in Wireshark, we find a bunch of
SMB traffic. Fortunately,
encryption is not enabled, or we’d be in a world of trouble. This level is
pretty straightforward, as Wireshark has an Export Objects feature for us.
(File > Export Objects > SMB). We can directly export 3.zip, and unzipping
it, we’re straight on to 3.pcap.

Layer 3: Git Smart Protocol
After we open 3.pcap, we find traffic for the “Git Smart Protocol”. You might
be used to seeing Git traffic going over either HTTP or SSH, but it turns out
Git has its own protocol for data
transfer.
The good news is that, unlike rsync, the protocol is well documented. The bad news is that it is more complex to extract data.
This data is also transmitted in chunks, but unlike rsync, the lengths are encoded in 4 hexadecimal characters (so 16 bits only). The data contained in the repository is transmitted as a Git packfile, which is separately described and specified.
At first, I just sought the start of a packfile (PACK), and looked for the 4
hex characters before for length, but there was a byte in between. It turns out
git also multiplexes data in order to pass the pack data and status updates at
the same time, so the format actually becomes:
- 4 hex characters, length (note: includes the length itself!)
- 1 octet, identifying the ‘sideband’ (channel) in use
- data
So we need to find the start of the packfile, back up 5 bytes, then start
decoding to get the whole packfile. (Again, this is a hack to avoid decoding
the whole protocol.) Each time, we read the length, the sideband number, then
the data. If the sideband number is 1, we concatenate this to get the raw
packfile data.
Once we have the packfile, we need to decode it and extract the objects from the git repository. Since every layer has been a zipfile, I reason we can extract a zipfile here as well, so I’ll hunt for objects in the packfile that are also zipfiles.
I wrote a script in python to do this (in order to have an automated solution), but you can even do this directly with git.
- Create an empty git repository.
- In the git repository, run
git unpack-objects < PACKFILE - Run
git cat-file --batch-all-objects --batch-checkto find information about all objects known to git. Only one is a blob, which is what git uses to refer to a chunk of actual data. - Run
git cat-file -p BLOBIDto cat the contents of the blob (the raw zipfile).
For example:
% git init
Initialized empty Git repository in /ctf/3tmp/.git/
% git unpack-objects < ../3.pack
Unpacking objects: 100% (3/3), 24.23 KiB | 24.23 MiB/s, done.
% git cat-file --batch-all-objects --batch-check
4067275272fa8d87b431329240f99e98c8c84887 blob 24633
7695bd963881302327d1ca5ff1fc4c4f04f342a2 tree 33
9f3d8f7b17525ec77c3bcf00ce2a4b305d47c6c9 commit 223
% git cat-file -p 4067275272fa8d87b431329240f99e98c8c84887 > tmp.zip
% unzip tmp.zip
Archive:  tmp.zip
  inflating: 2.pcap
So, we have 2.pcap, and we’re off to the next level!
Layer 2: dnscat2
Upon opening 2.pcap in Wireshark, we’ll notice a large quantity of DNS traffic
right off the bat. Using Wireshark’s DNS statistics, we see that it’s mostly
larger record types: TXT, MX, and CNAME.

The first few queries we see are for dnscat2.c2.challenges.bsidessf.net.
Looking up dnscat2 we find that it’s a
DNS tunneling protocol written by fellow BSidesSF CTF organizer
@iagox86. The good news is that it’s
well-documented: both the transport
protocol and
the command
protocol.
Looking at the command protocol, we see that the file data is sent in one contiguous block, so if we can reconstruct the transport protocol, we can just carve out the zipfile we expect at the next layer.
To reconstruct the transport protocol, we must take each DNS response and decode
it. Only 3 types of DNS records are being used: TXT, MX, and CNAME. For TXT
records, the entire response will be hex-encoded data. For the MX and CNAME
records, the response will be formatted like a valid DNS name by appending the
domain of the C2 server, so it will be <hexstring>.c2.challenges.bsidessf.net.
The hexstring may be split into multiple labels to fit the DNS limits on 63
bytes per label.
The simple way to handle all this is to delete . and
.c2.challenges.bsidessf.net from all the responses, so we just have the hex
data left. Then, in each response, it begins with the following:
- 2 octets: packet_id
- 1 octet: message_type
- 2 octets: session_id
- 2 octets: seq number
- 2 octets: ack number
This is followed by the actual data. If packets were out of order, repeated, or dropped, we might need to deal with this, but I can work around it by just dropping the first 9 octets from each message. I once again turned to scapy to solve this problem:
def decode_bytes(b):
    return bytes.fromhex(b.replace(b'.c2.challenges.bsidessf.net.', b'').replace(b'.', b'').decode('ascii'))

def c2_pkt(pkt):
    if pkt.haslayer(scapy.DNSRR):
        if isinstance(pkt[scapy.DNSRR].rdata, list):
            return decode_bytes(b''.join(pkt[scapy.DNSRR].rdata))
        return decode_bytes(pkt[scapy.DNSRR].rdata)
    if pkt.haslayer(scapy.DNSRRMX):
        return decode_bytes(pkt[scapy.DNSRRMX].exchange)


pcap = scapy.rdpcap('2.pcap')
pkts = [p for p in pcap
        if p.haslayer(scapy.UDP) and
            p.haslayer(scapy.DNS) and
            p[scapy.DNSQR].qname != b'dnscat2.c2.challenges.bsidessf.net.']
c2_data = [c2_pkt(p) for p in pkts]
c2_data = [p[9:] for p in c2_data if p is not None]
data_stream = b''.join(c2_data)
cut_data = data_stream[data_stream.index(b'PK\x03\x04'):]
open('1.zip', 'wb').write(cut_data)
This gets us 1.zip, which contains 1.pcap, as we expect. Getting close now!
Layer 1: Telnet
This should be the hardest layer by the tradition of Matryoshka. It turns out
that I went a little easy here. If we load 1.pcap into Wireshark, we see a
single telnet connection.

There’s no obvious flag, and the login password
appears to be thisisnottheflag, but there’s also a command to cat a bunch of
data to a flag.txt file:
echo -e "\x43\x54\x46\x7b\x62\x61\x62\x79\x5f\x77\x69\x72\x65\x73\x68\x61\x72\x6b\x5f\x64\x6f\x6f\x5f\x64\x6f\x6f\x5f\x64\x6f\x6f\x5f\x62\x61\x62\x79\x5f\x77\x69\x72\x65\x73\x68\x61\x72\x6b\x7d" > flag.txt
If we run this command ourselves, we’re rewarded:
% echo -e "\x43\x54\x46\x7b\x62\x61\x62\x79\x5f\x77\x69\x72\x65\x73\x68\x61\x72\x6b\x5f\x64\x6f\x6f\x5f\x64\x6f\x6f\x5f\x64\x6f\x6f\x5f\x62\x61\x62\x79\x5f\x77\x69\x72\x65\x73\x68\x61\x72\x6b\x7d"
CTF{baby_wireshark_doo_doo_doo_baby_wireshark}
Conclusion
You can see the automated solution script and all the individual layers in our open-source challenge release. Hopefully you found this challenge fun, educational, and/or challenging. I promise no files were corrupt when they were transferred, it just turns out that not all protocols are so straightforward.