The IoT Hacker’s Toolkit
Today, I’m giving a talk entitled “The IoT Hacker’s Toolkit” at BSides San Francisco. I thought I’d release a companion blog post to go along with the slide deck. I’ll also include a link to the video once it gets posted online.
- TOC {:toc}
Introduction
From my talk synopysis:
IoT and embedded devices provide new challenges to security engineers hoping to understand and evaluate the attack surface these devices add. From new interfaces to uncommon operating systems and software, the devices require both skills and tools just a little outside the normal security assessment. I’ll show both the hardware and software tools, where they overlap and what capabilities each tool brings to the table. I’ll also talk about building the skillset and getting the hands-on experience with the tools necessary to perform embedded security assessments.
While some IoT devices can be evaluated from a purely software standpoint (perhaps reverse engineering the mobile application is sufficient for your needs), a lot more can be learned about the device by interacting with all the interfaces available (often including ones not intended for access, such as debug and internal interfaces).
Background
I’ve always had a fascination with both hacking and electronics. I became a radio amateur at age 11, and in college, since my school had no concentration in computer security, I selected an embedded systems concentration. As a hacker, I’ve viewed the growing population of IoT devices with fascination. These devices introduce a variety of new challenges to hackers, including the security engineers tasked with evaluating these devices for security flaws:
- Unfamiliar architectures (mostly ARM and MIPS)
- Unusual interfaces (802.15.4, Bluetooth LE, etc.)
- Minimal software (stripped C programs are common)
Of course, these challenges also present opportunities for hackers (white-hat and black-hat alike) who understand the systems. While finding a memory corruption vulnerability in an enterprise web application is all but unheard of, on an IoT device, it’s not uncommon for web requests to be parsed and served using basic C, with all the memory management issues that entails. In 2016, I found memory corruption vulnerabilities in a popular IP phone.
Think Capabilities, Not Toys
A lot of hackers, myself included, are “gadget guys” (or “gadget girls”). It’s hard not to look at every possible tool as something new to add to the toolbox, but at the end of the day, one has to consider how the tool adds new capabilities. It needn’t be a completely distinct capability, perhaps it offers improved speed or stability.
Of course, this is a “do as I say, not as I do” area. I, in fact, have quite a number of devices with overlapping capabilities. I’d love to claim this was just to compare devices for the benfit of those attending my presentation or reading this post, but honestly, I do love my technical toys.
Software
Much of the software does not differ from that for application security or penetration testing. For example, Wireshark is commonly used for network analysis (IP and Bluetooth), and Burp Suite for HTTP/HTTPS.
The website fccid.io is very useful in reconnaissance of devices, providing information about the frequencies and modulations used, as well as often internal pictures of devices, which can also reveal information such as chipsets, overall architecture, etc., all without lifting a screwdriver.
Reverse Engineering
Firmware images are often multiple files concatentated, or contain proprietary metadata headers. Binwalk walks the image, looking for known file signatures, and extracts the components. Often this will include entire Linux filesystems, kernel images, etc.
Once you have extracted this, you might be interested in analyzing the binaries or other software contained inside. Often a disassembler is useful. My current favorite disassembler is Binary Ninja, but there are a number of options:
Basic Tools
There’s a few tools that I consider absolutely essentially to any sort of hardware hacking exercise. These tools are fundamental to gaining an understanding of the device and accessing multiple types of interfaces on the device.
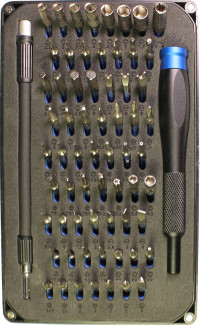
Screwdriver Set
 {:.right}
A screwdriver set might be an obvious thing, but you’ll want one with bits that can get into tight places, are appropriately sized to the screws on your device (using the wrong size Phillips screwdriver bit is one of the easiest ways to strip a screw). Many devices also use “security screws”, which seems to be a term applied to just about any screw that doesn’t come in your standard household tool kit. (I’ve seen Torx, triangle bits, square bits, Torx with a center pin, etc.)
I have a wonderful driver kit from iFixit, and I’ve found almost nothing that it won’t open. The extension driver helps get into smaller spaces, and the 64 bits cover just about everything. I personally like to support iFixit because they have great write-ups and tear downs, but there are also cheaper clones of this toolkit.
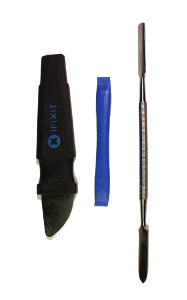
Openers
 {:.left}
Many devices are sealed with plastic catches or pieces that are press-fit together. For these, you’ll need some kind of opener (sometimes called a “spudger”) to pry them apart. I find a variety of shapes useful. You can get this a as part of a combined tool kit from iFixit, iFixit clones, or openers by themselves. I have found the iFixit model to be of slightly higher quality, but I also carry a cheap clone for occassional travel use.
The very thin metal one with a plastic handle is probably my favorite opener – it fits into the thinnest openings, but consequently it also bends fairly easily. I’ve been through a few due to bending damage. Be careful how you use these tools, and make sure your hand is not where they will go if they slip! They are not quite razor-blade sharp, but they will cut your hand with a bit of force behind them.
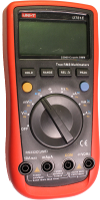
Multimeter
I get it, you’re looking to hack the device, not rewire your car. That being said, for a lot of tasks, a halfway decent multimeter is somewhere between an absolute requirement and a massive time saver. Some of the tasks a multimeter will help with include:
 {:.right}
- Identifying unknown pinouts
- Find the ground pin for a UART
- Checking which components are connected
- Figuring out what kind of power supply you need
- Checking the voltage on an interface to make sure you don’t blow something up
I have several multimeters (more than one is important for electronics work), but you can get by with a single one for your IoT hacking projects. The UNI-T UT-61E is a popular model at a good price/performance ratio, but its safety ratings are a little optimistic. The EEVBlog BM235 is my favorite of my meters, but a little higher end (aka expensive). If you’re buying for work, the Fluke 87V is the “golden standard” of multimeters.
If you buy a cheap meter, it will probably work for IoT projects, but there are many multimeters that are unsafe out there. Please do not use these cheap meters on “mains” electricity, high voltage power supplies, anything coming out of the wall, etc. Your personal safety is not worth saving $40.
Soldering Iron
You will find a lot of unpopulated headers (just the holes in the circuit board) on production IoT devices. The headers for various debug interfaces are left out, either as a cost savings, or for space reasons, or perhaps both. The headers were used during the development process, but often the manufacturer wants to leave the connections either to avoid redoing the printed circuit board (PCB) layout, or to be able to debug failures in the field.
In order to connect to these unpopulated headers, you will want to solder your own headers in their place. To do so, you’ll need a soldering iron. To minimize the risk of damaging the board in the process, use a soldering iron with a variable temperature and a small tip. The Hakko FX-888D is very popular and a very nice option, but you can still do good work with something like this Aoyue or other options. Just don’t use a soldering iron designed for a plumber or similiar uses – you’ll just end up burning the board.
Likewise, you’ll want to practice your soldering skills before you start work on your target board – find some small soldering projects to practice on, or some through away scrap electronics to work on.
I love the Schmartboard Breakout Boards to help solder surface mount components. They have small grooves to help solder if you don’t have experience with SMD components. Just use a small tip and it’s quite simple to solder. I’ve used them with flash memory chips for firmware extractions and other similar use cases.
Network Interfaces
Obviously, these devices have network interfaces. After all, they are the “Internet of Things”, so a network connection would seem to be a requirement. Nearly universally, 802.11 connectivity is present (sometimes on just a base station), and ethernet (10/100 or Gigabit) interfaces are also very common.
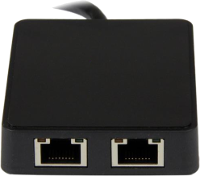
Wired Network Sniffing
 {:.left}
The easiest way to sniff a wired network is often a 2nd interface on your computer. I’m a huge fan of this USB 3.0 to Dual Gigabit Adapter, which even has a USB-C version for those using one of the newer laptops or Macbooks that only support USB-C. Either option gives you two network ports to work with, even on laptops without built-in wired interfaces.
Beyond this, you’ll need software for the sniffing. Wireshark is an obvious tool for raw packet capture, but you’ll often also want HTTP/HTTPS sniffing, for which Burp Suite is the defacto standard, but mitmproxy is an up-and-coming contender with a lot of nice features.
Wireless Network Sniffing
Most common wireless network interfaces on laptops can perform monitor mode, but perhaps you’d like to connect your wireless to use the internet, as well as sniff on another interface. Alfa wireless cards like the AWUSO36NH and the AWUSO36ACH have been quite popular for a while, but I personally like using the tiny RT5370-based adapters for assessments not requiring long range due to its compact size and portability.
Wired (Debug/Internal) Interfaces
There are many subtle interfaces on IoT devices, intended for either debug use, or for various components to communicate with each other. For example:
- SPI/I2C for flash chips
- SPI/SD for wifi chips
- UART for serial consoles
- UART for bluetooth/wifi controllers
- JTAG/SWD for debugging processors
- ICSP for In-Circuit Programming
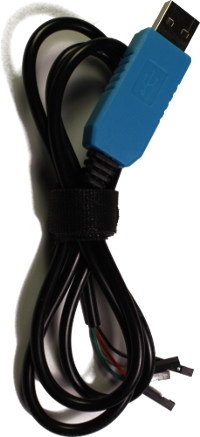
UART
 {:.right}
Though there are many universal devices that can do other things, I run into UARTs so often that I like having a standalone adapter for this. Additionally, having a standalone adapter allows me to maintain a UART connection at the same time as I’m working with JTAG/SWD or other interfaces.
You can get a standalone cable for around $10, that can be used for most UART interfaces. (On most devices I’ve seen, the UART interface is 3.3v, and these cables work well for that.) Most of these cables have the following pinout, but make sure you check your own:
- Red: +5V (Don’t connect on most boards)
- Black: GND
- Green: TX from Computer, RX from Device
- White: RX from Computer, TX from Device
There are also a number of breakouts for the FT232RL or the CH340 chips for UART to USB. These provide a row of headers to connect jumpers between your target device and the adapter. I prefer the simplicity of the cables (and fewer jumper ends to come loose during my testing), but this is further evidence that there are a number of options to provide the same capabilities.
Universal Interfaces (JTAG/SWD/I2C/SPI)
There are a number of interface boards referred to as “universal interfaces” that have the capability to interface with a wide variety of protocols. These largely fit into two categories:
- Bit-banging microcontrollers
- Hardware interfaces (dominated by the FT*232 series from FTDI)
There are a number of options for implementing a bit-banging solution for speaking these protocols, ranging from software projects to run on an Arduino, to projects like the Bus Pirate, which uses a PIC microcontroller. These generally present a serial interface (UART) to the host computer and applications, and use in-band signalling for configuration and settings. There may be some timing issues on certain devices, as microcontrollers often cannot update multiple output pins in the same clock cycle.
 {:.left}
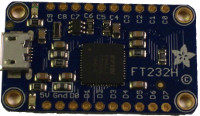
Hardware interfaces expose a dedicated USB endpoint to talk to the device, and though this can be configured, it is done via USB endpoints and registers. The protocols are implemented in semi-dedicated hardware. In my experience, these devices are both faster and more reliable than bit-banging microcontrollers, but you are limited to whatever protocols are supported by the particular device, or the capabilities of the software to drive them. (For example, the FT*232H series can do most protocols via bit-banging, but it updates an entire register at a time, and has high enough speed to run the clock rate of many protocols.)
The FT2232H and FT232H (not to be confused with the FT232RL, which is UART only), in particular, has been incorporated into a number of different breakout boards that are excellent universal interfaces:
- Adafruit FT232 breakout (my personal favorite) (Amazon)
- TUMPA and TUMPA Lite (Amazon)
- FTDI C232HM Cable (my 2nd favorite, easiest to use) (Amazon)
Logic Analyzer
 {:.right}
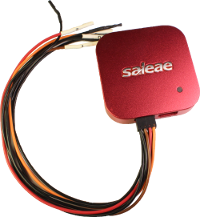
When you have an unknown protocol, unknown pinout, or unknown protocol settings (baudrate, polarity, parity, etc.), a logic analyzer can dramtically help by allowing you a direct look at the signals being passed between chips or interfaces.
I have a Saleae Logic 8, which is a great value logic analyzer. It has a compact size and their software is really excellent and easy to use. I’ve used it to discover the pinout for many unlabeled ports, discover the settings for UARTs, and just generally snoop on traffic between two chips on a board.
Though there are cheap knock-offs available on eBay or AliExpress, I have tried them and they have very poor quality, and unfortunately the open-source sigrok software is not quite the quality of the Saleae software. Additionally, they rarely have any input protection to prevent you from blowing up the device yourself.
Wireless
Obviously, the Internet of Things has quite a number of wireless devices. Some of these devices use WiFI (discussed above) but many use other wireless protocols. Bluetooth (particularly Bluetooth LE) is quite common, but in other areas, such as home automation, other protocols prevail. Many of these are based on 802.15.4 (Zigbee, Z-Wave) or proprietary protocols in the 433 MHz, 915 MHz, or 2.4 GHz ISM bands.
Bluetooth
 {:.right}
Bluetooth devices are incredibly common, and Bluetooth Low Energy (starting with Bluetooth 4.0) is very popular for IoT devices. Most devices that do not stream audio, provide IP connectivity, or have other high-bandwidth needs seem to be moving to Bluetooth Low Energy, probably because of several reasons:
- Lower power consumption (battery friendly)
- Cheaper chipsets
- Less complex implementation
There is essentially only one tool I can really recommend for assessing
Bluetooth, and that is the Ubertooth
One
(Amazon). This can follow and capture Bluetooth
communications, providing output in pcap or pcap-ng format, allowing you to
import the communications into Wireshark for later analysis. (You can also use
other pcap-based tools like scapy for analysis of the resulting pcaps.) The
Ubertooth tools are available in Debian, Ubuntu, or Kali as packages, but you
can get a more up to date version of the software from their Github
repository.
Adafruit also offers a BLE Sniffer which works only for Bluetooth Low Energy and utilizes a Nordic Semiconductor BLE chip with a special firmware for sniffing. The software for this works well on Windows, but not so well on Linux where it is a python script that tends to be more difficult to use than the Ubertooth tools.
Software Defined Radio
 {:.left}
For custom protocols, or to enable lower-level evaluation or attacks of radio-based systems, Software Defined Radio presents an excellent opportunity for direct interaction with the RF side of the IoT device. This can range from only receiving (for purposes of understanding and reverse engineering the device) to being able to simultaneously receive and transmit (full-duplex) depending upon the needs of your assessment.
For simply receiving, there are simple DVB-T dongles that have been repurposed as general-purpose SDRs, often referred to as “RTL SDRs”, a name based on the Realtek RTL2832U chips present in the device. These can be used because the chip is capable of providing the raw samples to the host operating system, and because of their low cost, a large open source community has emerged. Companies like NooElec are now even offering custom built hardware based on these chips for the SDR community. There’s also a kit that expands the receive range of the RTL-SDR dongles.
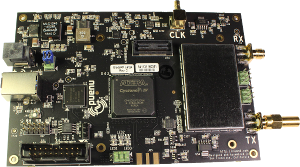
In order to transmit as well, the hardware is significantly more complex, and most options in this space are driven by an FPGA or other powerful processor. Even a few years ago, the capabilities here were very expensive with tools like the USRP. However, the HackRF by Great Scott Gadgets and the BladeRF by Nuand have offered a great deal of capability for a hacker-friendly price.
I personally have a BladeRF, but I honestly wish I had bought a HackRF instead. The HackRF has a wider usable frequency range (especially at the low end), while the BladeRF requires a relatively expensive upconverter to cover those bands. The HackRF also seems to have a much more active community and better support in some areas of open source software.
Other Useful Tools
It is occasionally useful to use an oscilloscope to see RF signals or signal integrity, but I have almost never found this necessary.
Specialized JTAG programmers for specific hardware often work better, but cost quite a bit more and are specialized to those specific items.
For dumping Flash chips, Xeltec programmers/dumpers are considered the “top of the line” and do an incredible job, but are at a price point such that only labs doing this on a regular basis find it worthwhile.