Merry Christmas: 2020 Holiday Ornament
First off, I want to wish everyone a Happy Holidays and a Merry Christmas. I know 2020 has been a hard year for so many, and I hope you and your families are healthy and making it through the year.
Over the past few years, I’ve gotten into making holiday ornaments for friends and family. In 2017, I did a snowflake PCB ornament. In 2018, I used laser cutting service Ponoko to cut acrylic fir trees with interlocking pieces. In 2019, I used my new 3D printer to print 3-dimensional snowflakes. In 2020, I’ve returned to my roots and gone with another PCB design. As a huge fan of DEFCON #badgelife, it felt appropriate to go back this way. I ended up with a touch-sensitive snowman with 6 LEDs.
 {:.left}
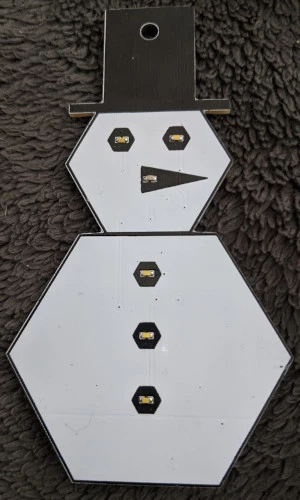
The ornament features a snowman created by the use of the black silkscreen and
white soldermask. The front artwork was created by drawing it in Inkscape, then
exporting to a PNG, and pulling into KiCad’s bmp2component. Of course,
bmp2component wants to put this as a footprint, so I had to adjust the resulting
kicad_mod file to put things on the silkscreen layer.
There are 6 LEDs. The eyes and buttons are white LEDs and the nose, befitting the typical carrot, is an orange LED. All the remaining components are on the reverse.
 {:.right .clear}
The back of the ornament houses all of the working bits. The main microcontroller is the Microchip ATtiny84A. It directly drives the LEDs via 6 of the I/O pins with 200Ω resistors for current limiting. {:.clear-left}
The power supply, at the lower right of the back side, is a boost converter to maintain 3.6V (necessary for the white LEDs with a bit of overhead) out of the coin cell battery. Coin cells start at 3V, which can barely run a white LED under a lot of conditions, but they drop fairly quickly. This power supply will keep things going down to at least 2.2V of input. Note that the actual chip for the power supply is a 2mm-by-2mm component – I didn’t realize just how hard that would be to actually assemble until I had them in my hands!
At the bottom left of the back is the capacitive touch sensor, the Microchip AT42QT1010. It connects to a copper area on the front of the ornament to detect a touch in that area. It produces a signal when the touch is detected, but that had to be debounced in software due to stray signals, probably from the LEDs.
Each ornament was hand assembled, leading to a limited run of 14. (15 if you count a prototype that’s wired up to a power supply instead of a battery supply.) The firmware running on the microcontroller is written in C, and was programmed onto the boards using the Tigard. I had intended to use pogo pins to program via the pads above the microcontroller, but I ended up using a chip clip to program instead.
I hope this might inspire others to give DIY PCB artwork a try. It’s quite simple if you know some basic electronics, and it’s really fun to see something you built come to life. Merry Christmas to all, and may 2021 be infinitely better than 2020.